Crafting a Leather Bottle – A Prototype
A few days ago I began constructing a leather bottle. I decided to start with a small size to avoid having to discard a large volume of the leather if things go awry. The process is straightforward.
- Cut a pattern for the bottle, flask, or canteen. I chose to use 5-6 ounce leather since I had it on hand. Others choose to use lighter (3-4 ounce) or heavier leather (10-12 ounce). Lighter leather will stretch more easily and easier to sew. It may not be as durable in the long term.
- Stitch the leather together. Most examples I have seen use a double row of stitching. The leather will be under some significant pressure when you expand the bottle. Twin rows should help keep the bottle sealed once it has been finished.
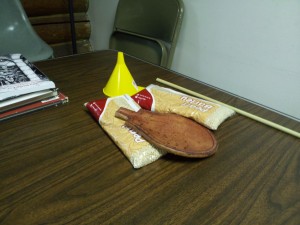
- Stretch the leather. Historically, it appears this process used sand to pack the bottle and stretch it. An alternative approach is to form the leather before sewing the two halves together. I decided to go with the packing method. Instead of sand, I chose t use pearl barley, which was mentioned as an alternative to sand. I could go buy clean sand but buying 80 pounds of play sand for a couple of bottles would be excessive.
- Let the bottle dry. Repeat the stretching process.
- Build a stopper for the jug. Most are fashioned from a dense wood that won’t naturally absorb the liquid inside the jug. You can fashion the stopper at any point. You will need some way of sealing the opening after packing and for the sealing process.
- Seal the leather. The common approach is to use beeswax or a combination of beeswax and brewers pitch (pine resin). Often the exterior is sealed with beeswax alone. The interior can use either the mix or just beeswax. I’m going to go for a combination when I get to the sealing process.
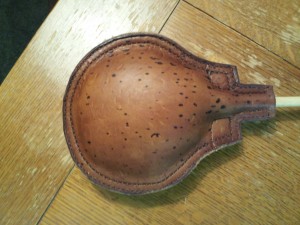
My prototype is approximately 6 inches in diameter with the top expanding into two squared of regions. Those regions will be punched with a hole or a slot to accommodate a carry strap. The spout is approximately 1.5 inches at the widest point. After sewing, over half an inch is lost, which made the spout very narrow. It really should be wider to allow easier packing not to mention filling and drinking. Mistake #1. The sew lines were approximately 1/4″ from the edge for the outer seam and 1/2″ from the inner. The outer seam should have been inset further. The front and back will not be the same size. Due to shifting, the outer seam was very close to the edge of the back for about an inch. Mistake #2. If I were more exact with the patterns, it would not have been an issue but just for safety, double check the overlap front to back to verify sufficient spacing.
After sewing, you can begin to construct the stopper. First determine how large the opening is. You can use math or just use a dowel to open up the leather until you have a general idea of how large it should be. I haven’t constructed mine yet. For now, I just trimmed down a larger dowel to secure the opening during the stretching process.
Once the stitching is complete, you are ready to stretch the leather to form a flask or bottle. Soak the leather until it is saturated. Some individuals mention several hours of soaking. I let mine soak in luke warm water for about an hour. If the leather is thick, you may need to allow more time. Use your stuffing dowel to work the neck of the jug open to its fullest dimension. Use the funnel to add sand or barley. Tamp the material down to the bottom. Repeat until the packing material has reached the bottom of your stopper in the neck. Do not be afraid to apply pressure. Pressure is what forces the leather to stretch into shape. I occasionally used a smaller rod to work material down the neck. It also allows you to angle the rod to hit various areas of the bottom seam.
Once its stretched. Stopper the jug and allow it to dry thoroughly. You may have to repeat the process several times to achieve the desired level of stretching. A few BB’s can be used to aid in knocking stubborn stuffing material loose from tight areas.
The initial stretch went better than I expected. I may do only one but I’ll see how it looks when it is fully dry. I didn’t like the distressed aspect on the front originally. It’s growing on me. Too bad I didn’t apply the same technique to the back panel. I’m going to find a nice chunk of aspen for my stopper. Probably not the best choice of wood but it will work for the prototype and I am in the middle of a National Forest.
Tags: DIY, Leather2 Comments
| M | T | W | T | F | S | S |
|---|---|---|---|---|---|---|
| 1 | 2 | 3 | 4 | 5 | ||
| 6 | 7 | 8 | 9 | 10 | 11 | 12 |
| 13 | 14 | 15 | 16 | 17 | 18 | 19 |
| 20 | 21 | 22 | 23 | 24 | 25 | 26 |
| 27 | 28 | 29 | 30 | 31 | ||
Popular Resources
Categories
- Brewing (11)
- Code (111)
- Convergence (26)
- Game Design (4)
- Hovel (1)
- Labyrinth Lord (71)
- Maintenance (9)
- Merakai (15)
- Musings (199)
- Old School (100)
- Random Generator (17)
- RPG (404)


[…] up the to-do list today. The process is straightforward and is easy enough to accomplish. Back in part one, I discussed the overall construction and stretching process. The prototype has had over a week to […]
[…] part 1, I discussed prototype assembly. Part 2 focused on sealing the bottle. The only thing remaining was […]